iOS Rich Push Notification
Push 세팅
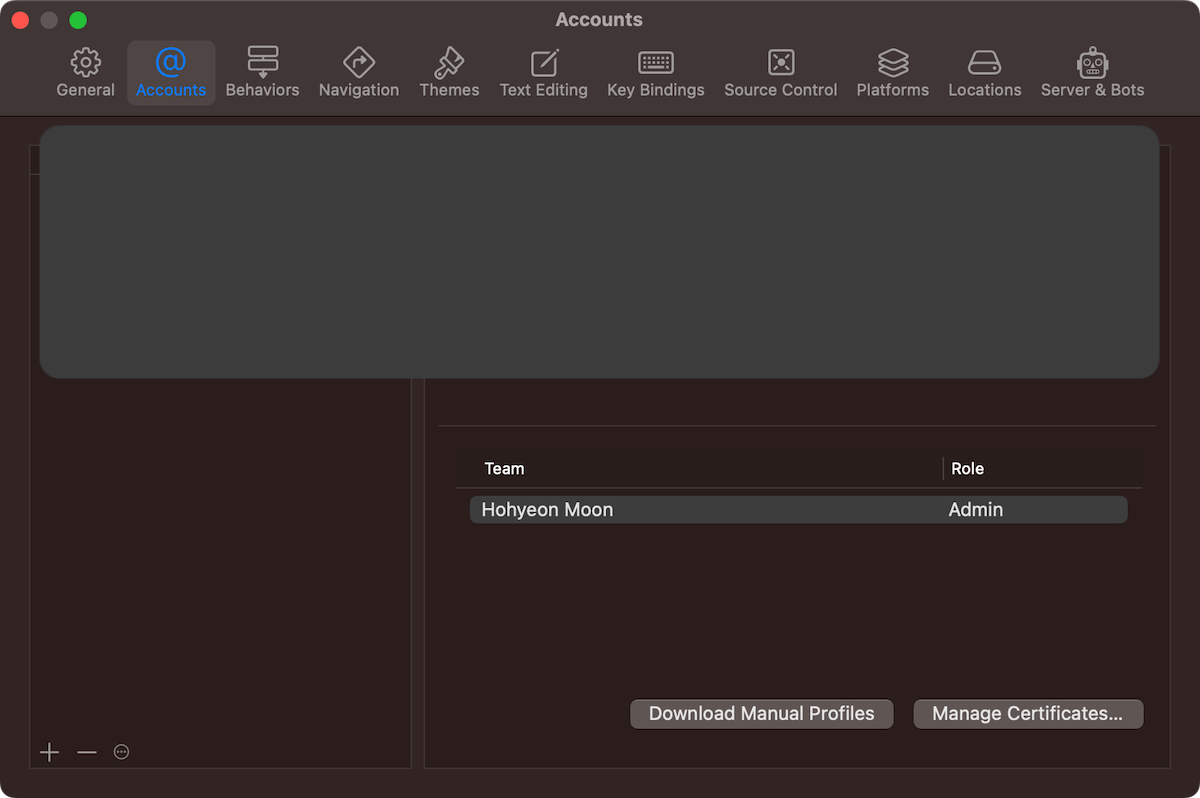
- Xcode에 Apple 계정 로그인을 합니다.
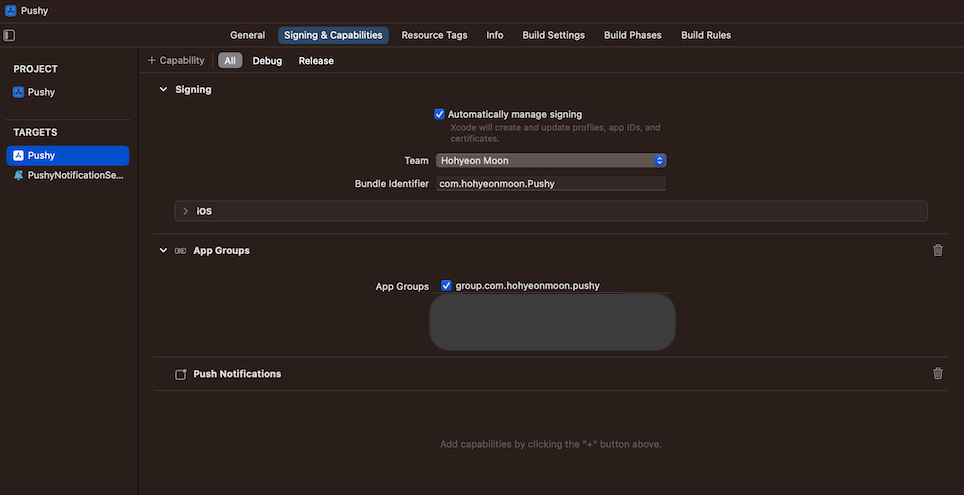
- 그리고
Signing과App Group설정하고, Capabilities에서Push Notifications를 추가합니다.
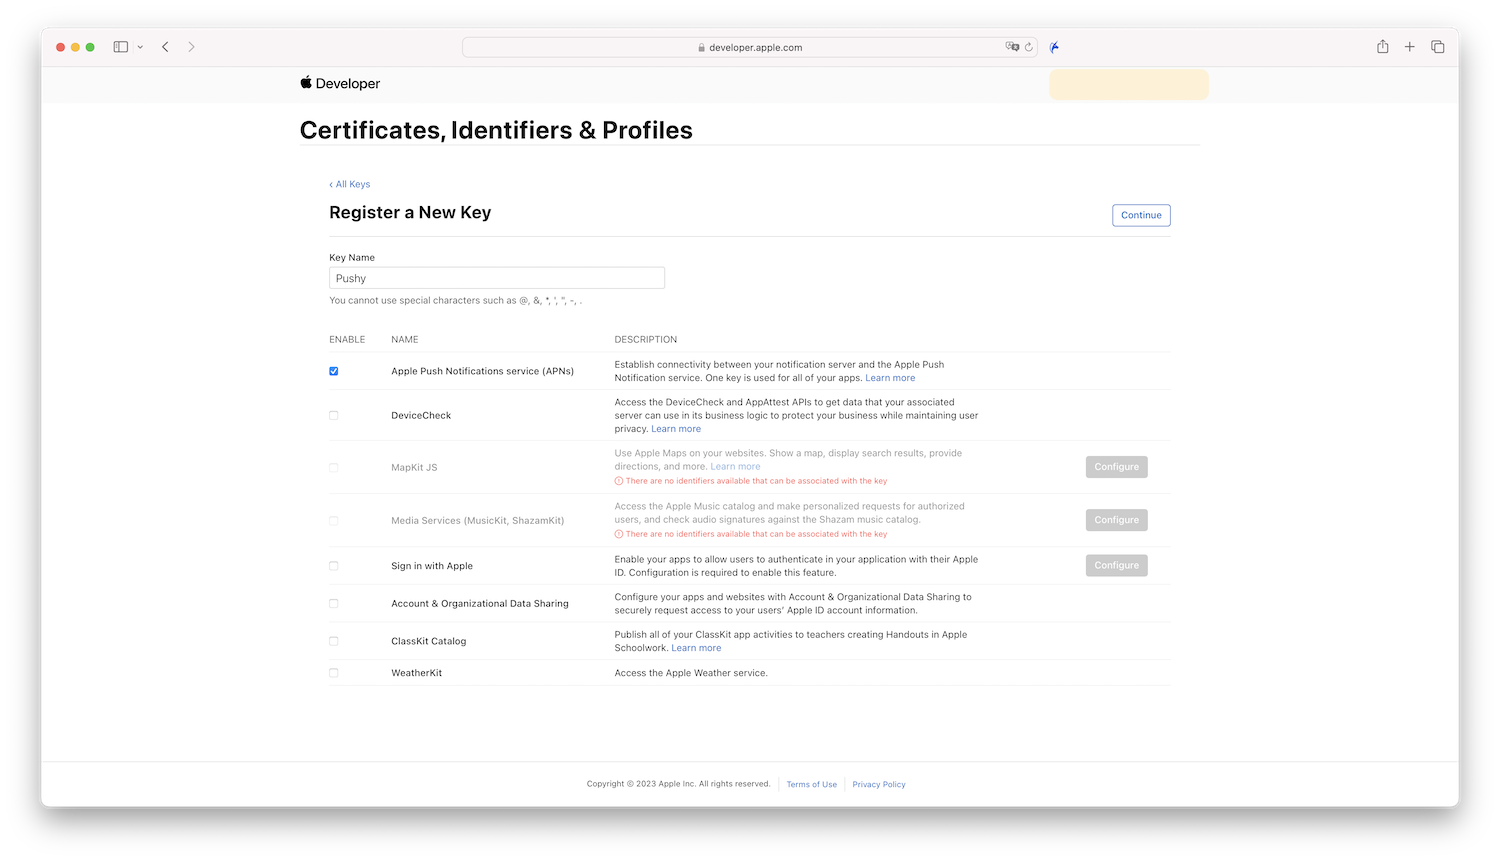
- Apple Developer 사이트에서 새로운 Key를 생성하고 APNs를 활성화합니다.
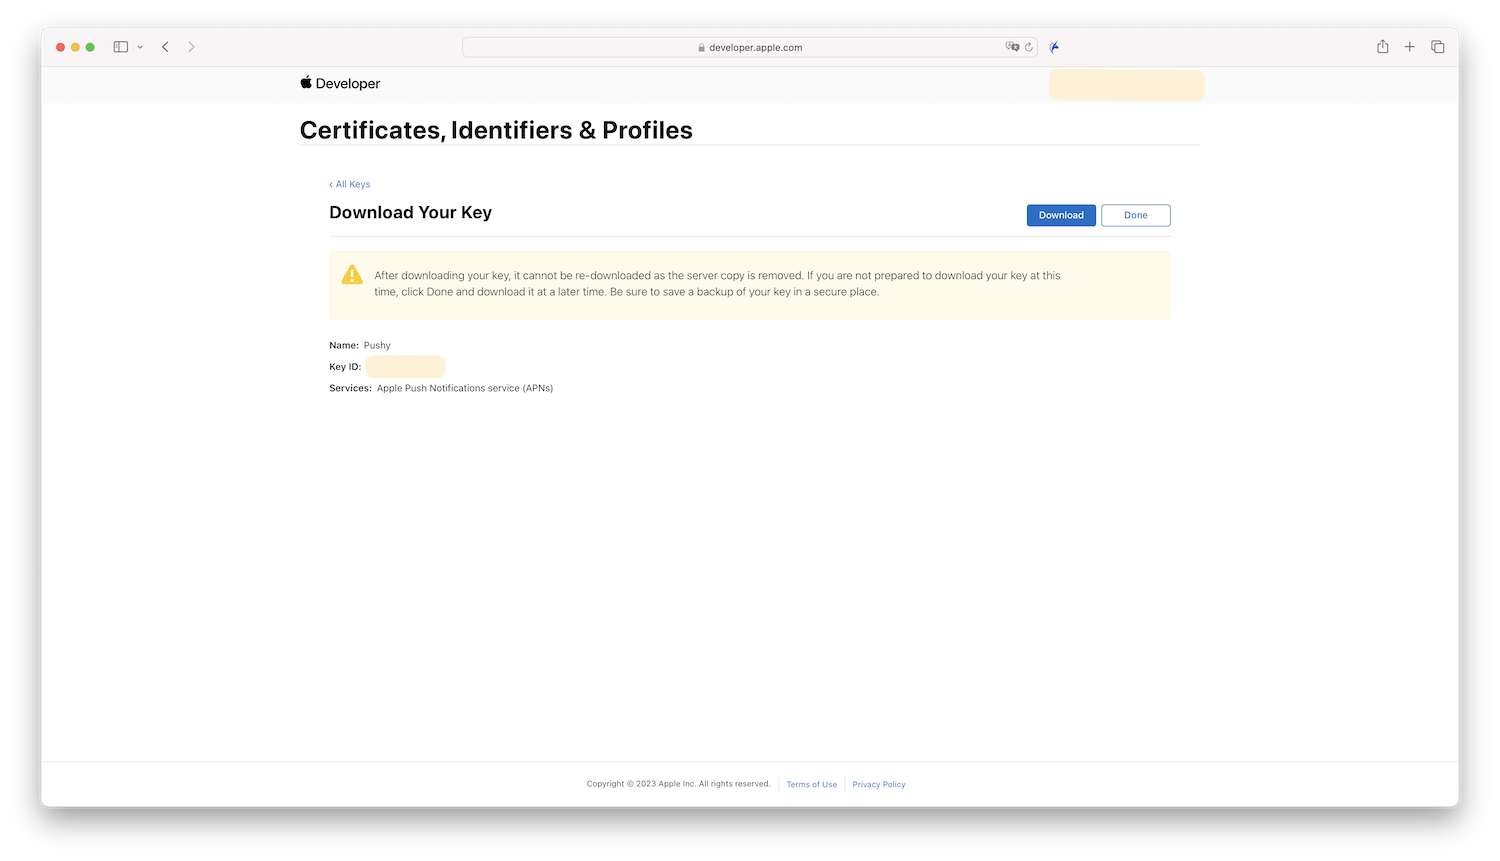
- Key가 생성되면 반드시 잘 보관하고,
Key ID도 기록해둡니다.
코드 구현
- 다음과 같이 Notification을 받기 위한 권한을 받습니다.
import UIKit

@main
class AppDelegate: UIResponder, UIApplicationDelegate {
  func application(_ application: UIApplication, didFinishLaunchingWithOptions launchOptions: [UIApplication.LaunchOptionsKey: Any]?) -> Bool {
    UNUserNotificationCenter.current().requestAuthorization(options: [.alert, .sound]) { granted, _ in
      if granted {
        DispatchQueue.main.async {
          UIApplication.shared.registerForRemoteNotifications()
        }
      }
    }
    return true
  }
}
- 권한을 받았으면, delegate 함수를 통해 push에 필요한 token 값을 처리합니다.
- 테스트를 위해 임의로 콘솔에 print 합니다.
func application(_ application: UIApplication, didRegisterForRemoteNotificationsWithDeviceToken deviceToken: Data) {
    let deviceToken: String = deviceToken.map { String(format: "%02.2hhx", $0) }.joined()
    print("Device token is: \(deviceToken)")
}
- Push Notification 수신 처리에 대한 구현을 합니다.
extension AppDelegate: UNUserNotificationCenterDelegate {
    // 앱이 포그라운드 상태일 때 푸시 수신
    func userNotificationCenter(_ center: UNUserNotificationCenter, willPresent notification: UNNotification, withCompletionHandler completionHandler: @escaping (UNNotificationPresentationOptions) -> Void) {
        let userInfo = notification.request.content.userInfo

        print("수신된 푸시 데이터: \(userInfo)")

        // 포그라운드에서 알림 표시 옵션 설정
        completionHandler([.banner, .badge, .sound])
    }

    // 사용자가 알림을 탭했을 때 처리
    func userNotificationCenter(_ center: UNUserNotificationCenter, didReceive response: UNNotificationResponse, withCompletionHandler completionHandler: @escaping () -> Void) {
        let userInfo = response.notification.request.content.userInfo

        // 알림 탭 처리 로직 구현
        print("사용자가 탭한 알림 데이터: \(userInfo)")

        completionHandler()
    }
}
- Rich Push Notification을 위한 구현을 시작합니다.
- File → New → Target을 통해 Notification Service Extension을 추가합니다.
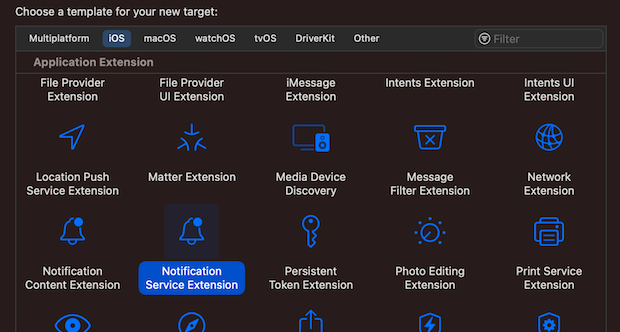
- 이 Target을 통해 Push Notification에 이미지를 띄우는 작업을 하면됩니다.
- 아래와 같이 NotificationService을 구현하면 이제 아이폰에서도 이미지 Push Notification을 띄울수 있게됩니다.
import UserNotifications

class NotificationService: UNNotificationServiceExtension {
  var contentHandler: ((UNNotificationContent) -> Void)?
  var bestAttemptContent: UNMutableNotificationContent?

  override func didReceive(
    _ request: UNNotificationRequest,
    withContentHandler contentHandler: @escaping (UNNotificationContent) -> Void
  ) {
    self.contentHandler = contentHandler
    bestAttemptContent = (request.content.mutableCopy() as? UNMutableNotificationContent)

    defer {
      contentHandler(bestAttemptContent ?? request.content)
    }

    guard let attachment = request.attachment else { return }

    bestAttemptContent?.attachments = [attachment]
  }

  override func serviceExtensionTimeWillExpire() {
    if let contentHandler = contentHandler,
       let bestAttemptContent =  bestAttemptContent {
      contentHandler(bestAttemptContent)
    }
  }
}

extension UNNotificationRequest {
  var attachment: UNNotificationAttachment? {
    guard let attachmentURL = content.userInfo["image"] as? String,
          let imageData = try? Data(contentsOf: URL(string: attachmentURL)!) else {
      return nil
    }
    return try? UNNotificationAttachment(data: imageData, options: nil)
  }
}

extension UNNotificationAttachment {
  convenience init(data: Data, options: [NSObject: AnyObject]?) throws {
    let fileManager = FileManager.default
    let temporaryFolderName = ProcessInfo.processInfo.globallyUniqueString
    let temporaryFolderURL = URL(fileURLWithPath: NSTemporaryDirectory()).appendingPathComponent(temporaryFolderName, isDirectory: true)

    try fileManager.createDirectory(at: temporaryFolderURL, withIntermediateDirectories: true, attributes: nil)
    let imageFileIdentifier = UUID().uuidString + ".png"
    let fileURL = temporaryFolderURL.appendingPathComponent(imageFileIdentifier)
    try data.write(to: fileURL)
    try self.init(identifier: imageFileIdentifier, url: fileURL, options: options)
  }
}
Push 테스트
- Notification Service Extension은 실기기에서만 작동합니다.
- 그래서 앱을 실기기에서 빌드하고 Push Notification Test를 다운로드 받아 실행합니다.
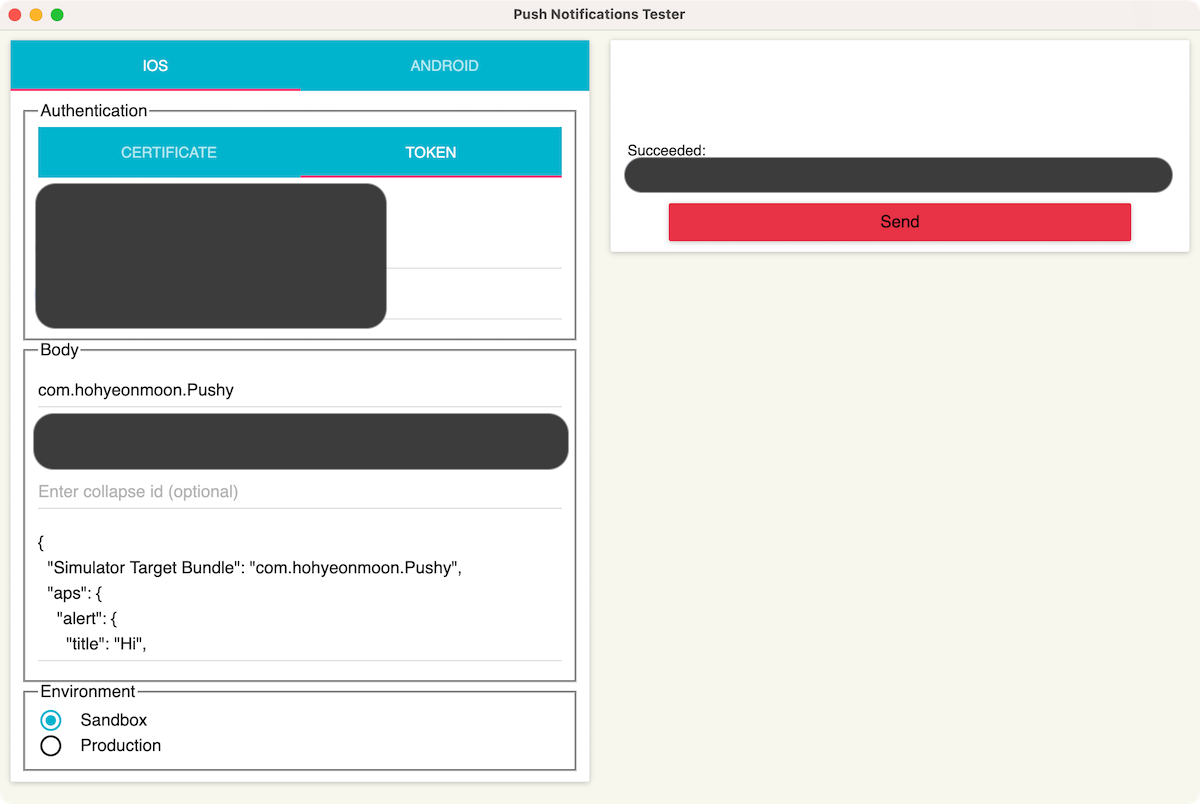
다음 정보들을 입력해 테스트 Push를 Send 하면 실기기에 Push 노티가 뜹니다.
- Authentication: Token
- P8 파일: Apple Developer 사이트에서 다운 받은 P8 파일 선택
- Key ID: Apple Developer 사이트에서 받은 Key ID
- Team ID: Apple Developer 사이트 우측 상단의 팀 ID
- Bundle ID: com.hohyeonmoon.Pushy
- Device Token: Xcode 콘솔에 프린트 된 토큰
- Environment: Sandbox
- Message:
{
  "Simulator Target Bundle": "com.hohyeonmoon.Pushy",
  "aps": {
    "alert": {
      "title": "Hi",
      "subtitle": "It's me",
      "body": "Hi. It's me, Hohyeon Moon."
    },
    "mutable-content": 1
  },
  "image": "https://www.hohyeonmoon.com/images/icon-logo-light.png"
}
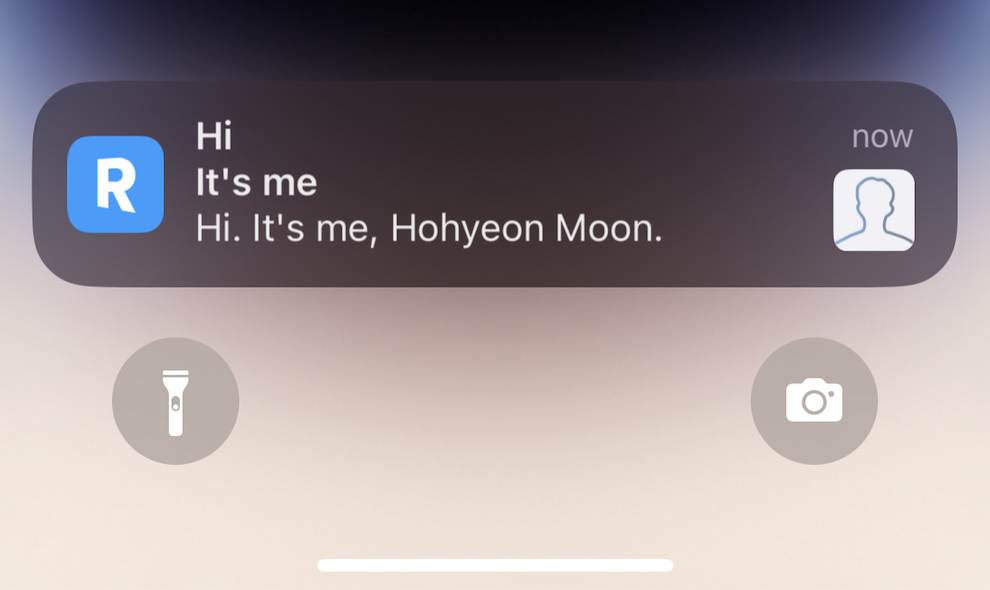
- 앱을 빌드한 실기기에 위와 같이 이미지가 포함된 Push Notification이 나타납니다.