SwiftUI MV 패턴
MVVM
사용 배경
- 많은 iOS 개발자는 SwiftUI에 UIKit에서의 경험과 습관을 가져왔다.
- UIKit에서 MVVM이 유용했기 때문에, SwiftUI에도 당연하게 사용되기 시작했다.
- 게다가 ObservableObject 혹은 Observable Macro는 이를 더욱 쉽도록 해줬다.
- 하지만 SwiftUI는 UIKit과는 다르게 설계된 프레임워크이다.
문제점

설계 원칙
- SwiftUI의 View는 가벼운 구조체로 설계되어 자주 재생성되지만, ViewModel은 이런 근본적인 설계 원칙과 충돌한다.
- SwiftUI에서 제공하는 @State, @Environment와 같은 프로퍼티 래퍼 활용을 포기하게 된다.
- SwiftData와 같은 SwiftUI와 함께 사용하기 위해 만들어진 다른 프레임워크를 SwiftUI와 함께 사용해보면, SwiftUI가 ViewModel 개념으로 사용하기 힘들다는 것을 더욱 절실하게 느낄 수 있다.
복잡도 생성
- Apple이 의도한 Single Source of Truth 철학을 무시하고 불필요한 간접층을 추가 하는것이다.
- 각 화면마다 ViewModel 생성으로 불필요한 Source of Truth를 추가한다.
- ViewModel의 주요 역할인 바인딩은 SwiftUI 프로퍼티 래퍼로 View내에서 직접 처리가 가능하다.
테스팅
- SwiftUI의 선언적 특성을 살린 단순한 View 테스팅 방식을 포기해야 한다.
- View는 최대한 단순해야 하는데 ViewModel 테스트를 위해 불필요한 복잡성이 추가된다.
- 실제 테스트해야 할 Business Logic과 Service에 집중하지 못하게 된다.
MV
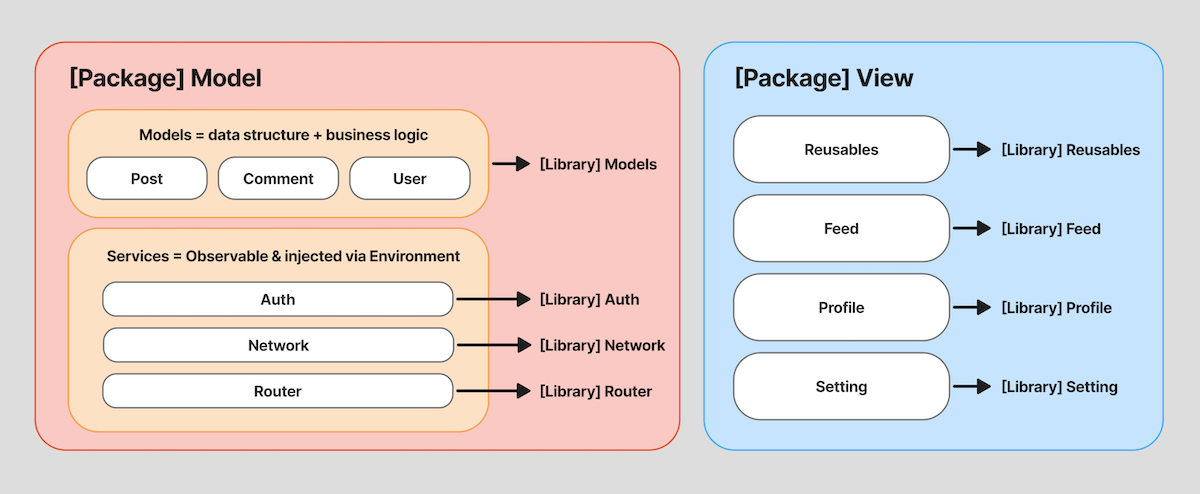
MVVM에서 ViewModel을 제거하면 MV 형태가 된다. Swift Package를 통해 크게 Model과 View로 나눌수 있고, 각 Package의 레이어는 Library로 다시 분리할수 있다.
- Models: Data structure와 Business logic
- Services: Auth, Network, Router 등 (Observable 할 수 있고, Environment로 주입)
- Views: 온전히 State를 나타내며 사용자 인터랙션 관리
Views
State Expression
- View는 State를 나타내기 위한 수단으로 사용한다.
struct FeedView: View {
    @Environment(Client.self) private var client

    enum ViewState {
        case loading
        case error(String)
        case loaded([Post])
    }

    @State private var viewState: ViewState = .loading
    @State private var isRefreshing = false

    var body: some View {
        NavigationStack {
            List {
                switch viewState {
                case .loading:
                    ProgressView("Loading feed...")
                        .frame(maxWidth: .infinity)
                        .listRowSeparator(.hidden)

                case .error(let message):
                    ErrorStateView(
                        message: message,
                        retryAction: { await loadFeed() }
                    )
                    .listRowSeparator(.hidden)

                case .loaded(let posts):
                    ForEach(posts) { post in
                        PostRowView(post: post)
                            .listRowInsets(.init())
                    }
                }
            }
            .listStyle(.plain)
            .refreshable { await refreshFeed() }
            .task { await loadFeed() }
        }
    }
}
Small and Simple
- SwiftUI에서 View는 비교적 쉽게 분리할수 있다.
- View에 버그가 있다면, 즉시 드러날 정도로 각 View는 작아야 한다.
- 하나의 파일에 담기에 View가 너무 커질 때가 있는데, 이때가 View를 분리 해야하는 시점이다.
struct PostDetailView: View {
    let post: Post
    @State private var isExpanded: Bool = false

    var body: some View {
        ScrollView {
            LazyVStack(spacing: 0) {
                PostHeaderView(post: post)
                PostContentView(post: post)
                PostActionsView(post: post, isExpanded: $isExpanded)
                PostRepliesView(postId: post.id)
            }
        }
    }
}
- Screen: 한 화면을 담당하는 풀스크린, 데이터를 fetch 혹은 filter 하는 등의 로직 포함
- Component: 화면의 일부를 담당하는 컴포넌트, 재사용 가능하게 부모 뷰로부터만 데이터 전달 받음
enum Events {
    case onChecked(Int)
    case onDelete(Int)
}

struct SomeScreen: View {
    var body: some View {
        List(1...20, id: \.self) { index in
            SomeComponent(index: index) { event in
                switch event {
                    case .onChecked(let index):
                        print(index)
                    case .onDelete(let index):
                        print(index)
                }
            }
        }
    }
}

struct SomeComponent: View {
    let index: Int
    let onEvent: (Events) -> Void

    var body: some View {
        HStack {
            Image(systemName: "square")
                .onTapGesture {
                    onEvent(.onChecked(index))
                }
            Text("\(index)")
            Spacer()
            Image(systemName: "trash")
                .onTapGesture {
                    onEvent(.onDelete(index))
                }
        }
    }
}
Services
Service 역할
- Service는 Auth, Network, Router 등이 해당된다.
- Service 객체는 Observable 할 수 있고, Environment로 주입된다.
- Serive에 포함될 Network Layer에 대한 자세한 내용은 Swift Network Layer를 참고하자.
final class Network {
    let baseURL: URL

    func get() async throws -> [Example] { ... }
    func update(_ example: Example) async throws -> Example? { ... }

    ...
}

@MainActor
@Observable
final class Router {
    private var paths = [Path]()

    ...
}
Environment 주입
- ViewModel을 사용할때는 의존성을 일일히 주입했다면, MV 패턴에서는 Environment를 적극 활용한다.
@Environment(Client.self) private var client

private func loadFeed() async {
    do {
        let posts = try await client.getFeed()
        viewState = .loaded(posts)
    } catch {
        viewState = .error(error.localizedDescription)
    }
}

private func refreshFeed() async {
    defer { isRefreshing = false }
    isRefreshing = true
    await loadFeed()
}
Models
- Model은 Data structure와 Business logic을 담당한다.
- 주로 Codable, Identifiable, Equatable, Hashable 등을 준수하는 struct 형태가 될 것이다.
struct FeedItem: Codable, Equatable, Identifiable, Hashable {
    var id: String { uri }

    let uri: String
    let displayName: String
    let description: String?
    let avatarImageURL: URL?
    let likesCount: Int
    let liked: Bool

    func hash(into hasher: inout Hasher) {
        hasher.combine(uri)
    }
}

extension FeedItem {
    @MainActor
    static var placeholders: [FeedItem] = Array(repeating: (), count: 10).map {
        .init(
            uri: UUID().uuidString,
            displayName: "Placeholder"
            description: nil
            avatarImageURL: nil,
            likesCount: 0,
            liked: false
        )
    }
}
- ViewState는 View 내의 프로퍼티나 로직이 많이 필요할때 사용할 수 있다.
- 하나의
@State프로퍼티로 만들면 된다.
struct ExampleView: View {
    @State private var state = ExampleState()
    ...
}

struct ExampleState {
    var name = ""
    var exampleName = ""
    var errors = ExampleError()

    mutating func isValid() -> Bool {
        if name.isEmpty {
            errors.name = "Name cannot be empty!"
        }

        if exampleName.isEmpty {
            errors.exampleName = "Coffee name cannot be empty"
        }

        return errors.name.isEmpty && errors.exampleName.isEmpty
    }
}
Testing
View
- View는 작은 단위로 테스트 할 수 있어야 한다.
- 작은 단위로 분리된 View와 Preview를 통해 빠르고 반복적으로 View를 확인할수 있다.
#Preview {
    private let service = Service(baseURL: URL(string: "https://url.com")!)

    ExampleView(example: nil)
        .environment(service)
}
- View를 테스트하고 싶다면, end-to-end UI 테스트를 진행하는 편이 낫다.
import XCTest

class ExampleAppUITests: XCTestCase {
    func testExampleViewInteraction() {
        let app = XCUIApplication()
        app.launch()

        let nameField = app.textFields["Name"]
        let exampleNameField = app.textFields["Example name"]

        nameField.tap()
        nameField.typeText("John Doe")

        exampleNameField.tap()
        exampleNameField.typeText("SwiftUI")

        app.buttons["Update"].tap()

        XCTAssertTrue(app.staticTexts["Update Successful"].exists)
    }
}
Model
- View보다 테스트가 중요한 부분은 Model 및 Service이다.
- 코드가 분리되어 있기 때문에 Unit test를 하기 용이하다.